- Never submerge or heavily wet the heating elements — even a damp cloth should be barely moist
- Always unplug your toaster oven and let it cool completely before cleaning
- Baking soda paste is the safest DIY cleaner for baked-on grease near heating elements
- A soft-bristle brush (like a clean pastry brush) is your best tool for sweeping debris off elements
- Running the toaster oven at 350°F for 10–15 minutes after cleaning burns off any remaining residue
If you’ve ever opened your toaster oven to a cloud of smoke when all you wanted was reheated pizza, you already know the problem. Grease and crumbs build up on and around the heating elements over time, and when those elements hit 400°F or higher, that buildup burns. Not just a smell — actual smoke, and sometimes a burnt taste that transfers to your food. Cleaning those elements without removing them sounds tricky, but it’s actually very doable with the right technique.
Why You Can’t (and Shouldn’t) Remove Toaster Oven Heating Elements
Most toaster oven heating elements are fixed in place. They’re wired directly into the unit and aren’t designed to be detached by the user. Trying to remove them risks breaking the connection, voiding your warranty, or worse — creating an electrical hazard the next time you plug the thing in.
And honestly, you don’t need to remove them. The cleaning method that works is about controlled, careful surface cleaning — not deep mechanical disassembly. Think of it more like cleaning a stovetop burner coil than scrubbing out a baking dish.
The elements themselves are typically made of nichrome wire or quartz, both of which are heat-resistant but surprisingly fragile when it comes to moisture and physical pressure. Understanding how hot a toaster gets helps put in perspective why leftover grease bakes on so aggressively — we’re talking sustained temperatures between 300°F and 500°F in regular use.
What You’ll Need Before You Start
You don’t need anything fancy. Most of this is already in your kitchen.
- Soft-bristle brush (a clean pastry brush or an old toothbrush both work great)
- Baking soda
- White vinegar or dish soap
- Two or three clean microfiber cloths or paper towels
- A small bowl for mixing paste
- Cotton swabs for tight spots
Skip the steel wool, abrasive scrubbers, and anything that sprays liquid. You want to stay in control of exactly how much moisture goes near those elements. A toaster oven cleaning brush set designed for small appliances can also make this a lot easier, especially for getting into the wire rack grooves and corners.
Step-by-Step: How to Clean Toaster Oven Heating Elements
Step 1 — Unplug and Cool Down Completely
This one isn’t optional. Unplug the toaster oven and give it at least 30 minutes to an hour to cool down fully. If you used it for something at high heat — like broiling — wait longer. The elements hold heat for a while even after the oven shuts off. Cleaning warm elements isn’t just uncomfortable, it’s genuinely dangerous.
Step 2 — Remove Everything You Can
Pull out the crumb tray, the wire rack, and any toaster oven baking pan you’ve got inside. Set those aside — you’ll clean them separately in the sink. Now you have clear access to the interior walls and heating elements without anything getting in the way.
Flip the toaster oven upside down over a trash can or sink and tap it gently to dislodge loose crumbs. You’d be surprised how much falls out.
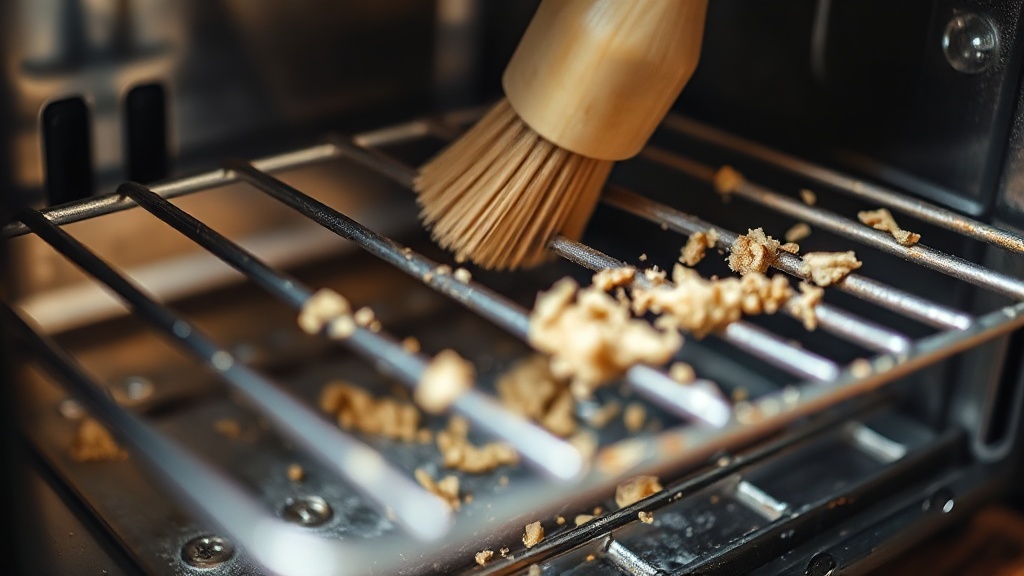
Step 3 — Brush the Elements Gently
Use your soft-bristle brush to gently sweep along the heating elements. Work in one direction — don’t scrub back and forth. You’re trying to dislodge loose crumbs and flaky grease, not abrade the surface. Be especially gentle at any bends or curves in the element, as those spots are more prone to cracking under pressure.
Brush the debris down toward the bottom of the oven cavity, then tilt and shake the unit again to get it out.
Step 4 — Treat Stubborn Grease with Baking Soda Paste
Mix about two tablespoons of baking soda with just enough water to form a thick paste — roughly the consistency of toothpaste. Apply a small amount directly to any grease spots on or around the elements using a cotton swab or the tip of your brush. Don’t smear it liberally or let it drip.
Let it sit for 10–15 minutes. The baking soda breaks down the grease chemically, so you don’t have to scrub hard. Then, using a barely damp cloth — wrung out as much as possible — wipe away the paste with light pressure. Follow up immediately with a dry cloth to absorb any remaining moisture.
For really stubborn spots, a cotton swab dipped in a tiny bit of white vinegar can help cut through the residue. But go one swab at a time and dry as you go.
Step 5 — Wipe Down the Interior Walls
While you’re in there, wipe down the interior walls and ceiling of the oven cavity. These surfaces accumulate grease splatter that eventually drips or smokes. Use the same baking soda paste method or a cloth lightly dampened with dish soap and water. Avoid getting liquid on the elements while doing this — work around them.
Step 6 — Burn Off Any Residue
Once everything looks clean and you’re confident the interior is dry, plug the toaster oven back in and run it empty at 350°F for about 10–15 minutes. This burns off any trace baking soda or moisture you might have missed. You may notice a faint smell — that’s normal. Open a window if needed. After this cycle, the oven is ready to use.
Cleaning Frequency and What to Expect
How often should you clean the heating elements? If you use your toaster oven daily, give the interior a light brush-down once a week and do a deeper clean like this once a month. If you mostly use it for toast and reheating, every six to eight weeks is probably fine. The crumb tray, though — that should be emptied every few days. Crumbs on the tray are one of the main causes of smoke in toaster ovens.
For tips on getting the most out of your appliance between cleanings, check out this guide on reheating food in a toaster oven — using the right temperature and technique reduces splatter and buildup significantly.
Cleaning Method Comparison
Not all cleaning approaches are equal when it comes to toaster oven heating elements. Here’s how the common methods stack up:
| Cleaning Method | Safe for Elements? | Effectiveness | Risk Level |
|---|---|---|---|
| Dry soft-bristle brush | Yes | Good for loose debris | Very Low |
| Baking soda paste + damp wipe | Yes (with care) | Excellent for grease | Low |
| White vinegar on cotton swab | Yes (minimal use) | Good for residue | Low |
| Spray cleaners / oven cleaner | No | N/A — avoid entirely | High |
| Wet cloth / soaking | No | Damages elements | High |
| Steel wool or abrasive pad | No | Physically damages elements | High |
Commercial oven cleaners like Easy-Off are a hard no for toaster ovens. They’re formulated for large self-cleaning ovens and contain caustic chemicals that can damage the finish, the elements, and leave fumes that are genuinely unsafe in a small enclosed appliance. According to Serious Eats, gentle and frequent cleaning beats aggressive occasional cleaning every time when it comes to small kitchen appliances.
When It’s Time to Think About Replacing Your Toaster Oven
Cleaning can only do so much. If your heating elements have visible cracks, dark spots that don’t clean off, or the oven takes noticeably longer to heat up than it used to, the elements may be failing. At that point, replacement parts (if available) or a new unit is worth considering.
If you’re shopping for a new one, our roundup of the best mini toaster ovens covers models that are easier to maintain and have better crumb management built in. And if you want to compare heating specs and wattage before buying, Food Network’s kitchen equipment guides are worth a look for real-world performance context.
Also worth checking: does the new model have a removable crumb tray that extends the full width of the oven? That single feature makes a bigger difference in long-term cleanliness than almost anything else. Look for toaster oven wire rack replacements that fit your model if the original has gotten too gunked up to clean properly.
Final Thoughts
Cleaning your toaster oven’s heating elements without removing them is less about scrubbing and more about being methodical and gentle. The brush-first, baking-soda-second approach handles 95% of what builds up in normal use. The real key is doing it regularly enough that grease never gets the chance to carbonize into something that needs serious effort to remove.
Keep it simple, keep it dry, and run a burn-off cycle when you’re done. Your toaster oven — and your food — will thank you for it.
Frequently Asked Questions
Can you use oven cleaner spray on toaster oven heating elements?
No — commercial oven cleaner sprays should never be used on toaster oven heating elements. They contain harsh chemicals like lye (sodium hydroxide) that can corrode the element coating, damage interior surfaces, and leave toxic residue that gets released when the oven heats up. Stick with baking soda paste and a barely damp cloth for safe, effective results.
What happens if water gets on toaster oven heating elements?
If a small amount of water contacts a cool, unplugged heating element, it’s usually not a problem as long as you dry it thoroughly before use. But if water gets on a hot element or pools in the unit and the oven is plugged in, it creates a serious electrical hazard. Always use the least moisture possible and run a dry heat cycle after any wet cleaning.
How do I get burnt smell out of my toaster oven?
The burnt smell almost always comes from grease or crumbs on or near the heating elements. Clean the elements and interior walls using the baking soda paste method, empty and wash the crumb tray, then run the oven empty at 350°F for 15 minutes to burn off any remaining residue. If the smell persists after cleaning, the element itself may have a carbon buildup that needs a second cleaning pass.
How often should I clean toaster oven heating elements?
For daily users, a light brush cleaning every one to two weeks and a deeper paste cleaning once a month is a good routine. Occasional users can get away with cleaning every six to eight weeks. The crumb tray is a separate matter — it should be emptied every few days regardless of how often you cook, since crumbs are the number one cause of smoke and burning smells.
Is it safe to clean toaster oven heating elements yourself?
Yes, cleaning the elements yourself is safe as long as the oven is fully unplugged and cooled before you start, and you use minimal moisture. The main risks — electrical shock and element damage — are both avoided by waiting until the unit is cold and using dry or barely damp tools. You don’t need a professional to clean a toaster oven unless there’s visible element damage or an electrical issue.
To clean toaster oven heating elements without removing them, use a dry or barely damp soft brush to gently sweep away loose debris, then apply a baking soda paste to stubborn grease spots and wipe carefully with a damp cloth — never soaking the elements. The heating elements are fragile and permanently mounted, so the goal is to clean around and on them with minimal moisture. Done right, this keeps your toaster oven running efficiently and cuts down on smoke and burning smells during cooking.
Key Takeaways
- Never submerge or heavily wet the heating elements — even a damp cloth should be barely moist
- Always unplug your toaster oven and let it cool completely before cleaning
- Baking soda paste is the safest DIY cleaner for baked-on grease near heating elements
- A soft-bristle brush (like a clean pastry brush) is your best tool for sweeping debris off elements
- Running the toaster oven at 350°F for 10–15 minutes after cleaning burns off any remaining residue
If you’ve ever opened your toaster oven to a cloud of smoke when all you wanted was reheated pizza, you already know the problem. Grease and crumbs build up on and around the heating elements over time, and when those elements hit 400°F or higher, that buildup burns. Not just a smell — actual smoke, and sometimes a burnt taste that transfers to your food. Cleaning those elements without removing them sounds tricky, but it’s actually very doable with the right technique.
Why You Can’t (and Shouldn’t) Remove Toaster Oven Heating Elements
Most toaster oven heating elements are fixed in place. They’re wired directly into the unit and aren’t designed to be detached by the user. Trying to remove them risks breaking the connection, voiding your warranty, or worse — creating an electrical hazard the next time you plug the thing in.
And honestly, you don’t need to remove them. The cleaning method that works is about controlled, careful surface cleaning — not deep mechanical disassembly. Think of it more like cleaning a stovetop burner coil than scrubbing out a baking dish.
The elements themselves are typically made of nichrome wire or quartz, both of which are heat-resistant but surprisingly fragile when it comes to moisture and physical pressure. Understanding how hot a toaster gets helps put in perspective why leftover grease bakes on so aggressively — we’re talking sustained temperatures between 300°F and 500°F in regular use.
What You’ll Need Before You Start
You don’t need anything fancy. Most of this is already in your kitchen.
- Soft-bristle brush (a clean pastry brush or an old toothbrush both work great)
- Baking soda
- White vinegar or dish soap
- Two or three clean microfiber cloths or paper towels
- A small bowl for mixing paste
- Cotton swabs for tight spots
Skip the steel wool, abrasive scrubbers, and anything that sprays liquid. You want to stay in control of exactly how much moisture goes near those elements. A toaster oven cleaning brush set designed for small appliances can also make this a lot easier, especially for getting into the wire rack grooves and corners.
Step-by-Step: How to Clean Toaster Oven Heating Elements
Step 1 — Unplug and Cool Down Completely
This one isn’t optional. Unplug the toaster oven and give it at least 30 minutes to an hour to cool down fully. If you used it for something at high heat — like broiling — wait longer. The elements hold heat for a while even after the oven shuts off. Cleaning warm elements isn’t just uncomfortable, it’s genuinely dangerous.
Step 2 — Remove Everything You Can
Pull out the crumb tray, the wire rack, and any toaster oven baking pan you’ve got inside. Set those aside — you’ll clean them separately in the sink. Now you have clear access to the interior walls and heating elements without anything getting in the way.
Flip the toaster oven upside down over a trash can or sink and tap it gently to dislodge loose crumbs. You’d be surprised how much falls out.
Step 3 — Brush the Elements Gently
Use your soft-bristle brush to gently sweep along the heating elements. Work in one direction — don’t scrub back and forth. You’re trying to dislodge loose crumbs and flaky grease, not abrade the surface. Be especially gentle at any bends or curves in the element, as those spots are more prone to cracking under pressure.
Brush the debris down toward the bottom of the oven cavity, then tilt and shake the unit again to get it out.
Step 4 — Treat Stubborn Grease with Baking Soda Paste
Mix about two tablespoons of baking soda with just enough water to form a thick paste — roughly the consistency of toothpaste. Apply a small amount directly to any grease spots on or around the elements using a cotton swab or the tip of your brush. Don’t smear it liberally or let it drip.
Let it sit for 10–15 minutes. The baking soda breaks down the grease chemically, so you don’t have to scrub hard. Then, using a barely damp cloth — wrung out as much as possible — wipe away the paste with light pressure. Follow up immediately with a dry cloth to absorb any remaining moisture.
For really stubborn spots, a cotton swab dipped in a tiny bit of white vinegar can help cut through the residue. But go one swab at a time and dry as you go.
Step 5 — Wipe Down the Interior Walls
While you’re in there, wipe down the interior walls and ceiling of the oven cavity. These surfaces accumulate grease splatter that eventually drips or smokes. Use the same baking soda paste method or a cloth lightly dampened with dish soap and water. Avoid getting liquid on the elements while doing this — work around them.
Step 6 — Burn Off Any Residue
Once everything looks clean and you’re confident the interior is dry, plug the toaster oven back in and run it empty at 350°F for about 10–15 minutes. This burns off any trace baking soda or moisture you might have missed. You may notice a faint smell — that’s normal. Open a window if needed. After this cycle, the oven is ready to use.
Cleaning Frequency and What to Expect
How often should you clean the heating elements? If you use your toaster oven daily, give the interior a light brush-down once a week and do a deeper clean like this once a month. If you mostly use it for toast and reheating, every six to eight weeks is probably fine. The crumb tray, though — that should be emptied every few days. Crumbs on the tray are one of the main causes of smoke in toaster ovens.
For tips on getting the most out of your appliance between cleanings, check out this guide on reheating food in a toaster oven — using the right temperature and technique reduces splatter and buildup significantly.
Cleaning Method Comparison
Not all cleaning approaches are equal when it comes to toaster oven heating elements. Here’s how the common methods stack up:
| Cleaning Method | Safe for Elements? | Effectiveness | Risk Level |
|---|---|---|---|
| Dry soft-bristle brush | Yes | Good for loose debris | Very Low |
| Baking soda paste + damp wipe | Yes (with care) | Excellent for grease | Low |
| White vinegar on cotton swab | Yes (minimal use) | Good for residue | Low |
| Spray cleaners / oven cleaner | No | N/A — avoid entirely | High |
| Wet cloth / soaking | No | Damages elements | High |
| Steel wool or abrasive pad | No | Physically damages elements | High |
Commercial oven cleaners like Easy-Off are a hard no for toaster ovens. They’re formulated for large self-cleaning ovens and contain caustic chemicals that can damage the finish, the elements, and leave fumes that are genuinely unsafe in a small enclosed appliance. According to Serious Eats, gentle and frequent cleaning beats aggressive occasional cleaning every time when it comes to small kitchen appliances.
When It’s Time to Think About Replacing Your Toaster Oven
Cleaning can only do so much. If your heating elements have visible cracks, dark spots that don’t clean off, or the oven takes noticeably longer to heat up than it used to, the elements may be failing. At that point, replacement parts (if available) or a new unit is worth considering.
If you’re shopping for a new one, our roundup of the best mini toaster ovens covers models that are easier to maintain and have better crumb management built in. And if you want to compare heating specs and wattage before buying, Food Network’s kitchen equipment guides are worth a look for real-world performance context.
Also worth checking: does the new model have a removable crumb tray that extends the full width of the oven? That single feature makes a bigger difference in long-term cleanliness than almost anything else. Look for toaster oven wire rack replacements that fit your model if the original has gotten too gunked up to clean properly.
Final Thoughts
Cleaning your toaster oven’s heating elements without removing them is less about scrubbing and more about being methodical and gentle. The brush-first, baking-soda-second approach handles 95% of what builds up in normal use. The real key is doing it regularly enough that grease never gets the chance to carbonize into something that needs serious effort to remove.
Keep it simple, keep it dry, and run a burn-off cycle when you’re done. Your toaster oven — and your food — will thank you for it.
Frequently Asked Questions
Can you use oven cleaner spray on toaster oven heating elements?
No — commercial oven cleaner sprays should never be used on toaster oven heating elements. They contain harsh chemicals like lye (sodium hydroxide) that can corrode the element coating, damage interior surfaces, and leave toxic residue that gets released when the oven heats up. Stick with baking soda paste and a barely damp cloth for safe, effective results.
What happens if water gets on toaster oven heating elements?
If a small amount of water contacts a cool, unplugged heating element, it’s usually not a problem as long as you dry it thoroughly before use. But if water gets on a hot element or pools in the unit and the oven is plugged in, it creates a serious electrical hazard. Always use the least moisture possible and run a dry heat cycle after any wet cleaning.
How do I get burnt smell out of my toaster oven?
The burnt smell almost always comes from grease or crumbs on or near the heating elements. Clean the elements and interior walls using the baking soda paste method, empty and wash the crumb tray, then run the oven empty at 350°F for 15 minutes to burn off any remaining residue. If the smell persists after cleaning, the element itself may have a carbon buildup that needs a second cleaning pass.
How often should I clean toaster oven heating elements?
For daily users, a light brush cleaning every one to two weeks and a deeper paste cleaning once a month is a good routine. Occasional users can get away with cleaning every six to eight weeks. The crumb tray is a separate matter — it should be emptied every few days regardless of how often you cook, since crumbs are the number one cause of smoke and burning smells.
Is it safe to clean toaster oven heating elements yourself?
Yes, cleaning the elements yourself is safe as long as the oven is fully unplugged and cooled before you start, and you use minimal moisture. The main risks — electrical shock and element damage — are both avoided by waiting until the unit is cold and using dry or barely damp tools. You don’t need a professional to clean a toaster oven unless there’s visible element damage or an electrical issue.